Documenting with Archiving in Mind
Download the Bonus Chapter as a PDF file!
Organizing is what you do before you do something, so that when you do it, it is not all mixed up.
—A. A. Milne
Educators know it is beneficial to be organized. This bonus chapter provides you with thoughts and recommendations for saving and accessing documentation artifacts collected in the during- and after-documentation phases. Primary and secondary learners can strategically archive artifacts (images, video, audio, text) based on their applicability and importance for current and future learning opportunities’ focuses and goals. Organizational strategies, such as documentation filters, archives, and searches also aid in curating and easily retrieving documentation artifacts.
Logistical Planning for Archiving Digital Files
Saving and archiving documentation artifact files requires the curator to see the bigger picture of where the artifacts fit into the learning process by making connections between a documentation artifact and:
- the current learning focuses and goals;
- previously captured artifacts; and
- the planned or unplanned need to access the artifact in the future.
The last connection is critical for saving and archiving documentation artifacts. When using a thoughtful, logical, and predictable approach to archiving, searching for folders and files takes only a few seconds. However, the opposite happens and someone saves a folder or file with “in the moment” reasoning; the curator could end up spending a few minutes (or hours) trying to relocate the seems-to-have-disappeared file. Over time, when large quantities of documentation-artifact files are created and accumulated, the ease of retrievability requires being proactive about using basic archiving protocols.
Platform Considerations
Since documentation artifacts can take on many digital formats, creating and maintaining at least one primary platform that serves as a central center or hub to access all the documentation files is beneficial for ongoing documenting needs and purposes. Silvia prefers a blog as her primary documentation platform because a blog can store, organize, embed, and display most types of media that she uses when documenting. Other potential primary platforms include Wikis, web sites (e.g., Weebly, Google Site), and portfolio apps (e.g., SeeSaw, Richer Picture).
Having secondary platforms is also recommended to supplement a primary documentation platform, such as Twitter, Pinterest, and Instagram. Secondary platforms do not have extensive media-integration capabilities, but are helpful in aiding the sharing or amplifying of documentation artifacts. For example, Pinterest is designed to curate and display images; YouTube and Vimeo is designed to host videos; and Flickr is designed to host images and short videos.
Here are considerations for choosing a primary platform for comprehensive documentation:
- Storage – What storage capacity does this platform have? Are there limits for storage or uploading file sizes? Can you download what you have placed on your selected platform to serve as a back-up?
- Embed – Can you easily embed image, video, or audio files in lieu of using the platform’s storage? Can you embed other forms of media using the available embed codes of other media platforms (e.g., <iframe>)?
- Feedback – Does the platform have the ability for viewers to leave feedback? Does the platform have choices for feedback protocols (e.g., moderated by host prior to being seen by public)?
- Organization – Does the platform allow you to organize the documentation artifacts so that you or viewers can search using filters, such as: names, dates, categories, tags, or labels?
- Media – Does the platform support the integration of multiple media forms?
Considering streamlining opportunities within any platforms, devices, and apps can also save time and frustration:
- Saving – How easy is it to save, name, and gain access to saved files? Do you need internet access to save the file?
- Sharing – Is there an easy way to share a file to the cloud from your documentation platforms or archives? Is there a convenient way to export and import files into other platforms, devices, or apps?
- Disseminating – Can you disseminate your documentation easily on social media from within the platform, device, or app?
Platform File Size Considerations
One of the questions mentions considering storage file size. Today’s cameras are constantly getting better at taking high-resolution photographs and videos. When the quality of the images and video increases—so does the file size. While these larger files allow printing at higher resolutions and making videos that look almost “live,” the file sizes can eat up a device’s or online storage space.
Most people rely on their smartphones, tablets, or portable computers to view media. Most of these devices’ screens are no larger than 15 inches. Therefore, documentation artifact files do not necessarily benefit from being saved at higher resolution. Likewise, most hosting platforms impose a limit on weekly, monthly, or total uploads according to the size of the files being uploaded, especially for video storage. Therefore, reducing the size of documentation artifacts by saving them in a lower resolution after editing and annotexting will reduce restrictions when uploading. For example, consider taking a screenshot of a large-resolution photo and upload the screenshot of the photo rather than the larger image. In 2017 it was wise to keep images under 1MB and videos under 200MB based on the requisites of most platforms. Given size will most likely increase as years go by; maybe someday the resolution will not be a concern or problem.
Platform Backup Considerations
Having a backup plan for all your stored documentation artifacts is wise and highly recommended. Nothing is more devastating than working hard to capture students’ or your evidence of learning and then lose it due to file problems, such as deletion, overwriting, or device failure. With the file size of videos and images ever-growing, it is also not uncommon during filming or taking photographs for the device, such as a tablet or cell phone, to run out of storage space.
Consider using a service that will store the media in the cloud, such as iCloud, Google, Flickr, YouTube, Vimeo, or Dropbox. Make sure that regular backups are taking place between a device you are using and a second hard drive automatically or manually. Be sure to go through the files to delete those that you do not want to keep before backing up to save on storage space.
Platform Media Type Considerations
Capturing documenting learning moments often dictate what is the best media choice (text, audio, video, image) to do so. For example, when looking for evidence of student learning related to reading, it is not advantageous to make a photo collage; rather, a video or audio file would best capture the students’ current reading fluency. Other times, there is leeway concerning what media can be used to best capture the desired evidence of learning.
Naming Conventions and Breadcrumb Trail Options
Regardless of the primary or secondary platform you choose for documenting purposes, the files uploaded to the platform are most often stored on a computer’s hard drive that uses a filing system; therefore, naming folders and files appropriately for retrieval is paramount. A naming convention is a systematic procedure wherein the name gives hints as to what the folder or file contains, as well as how the folder or file relates to other folders or files. A breadcrumb trail is a navigation method that allows someone to see the path being followed to get to a particular file.
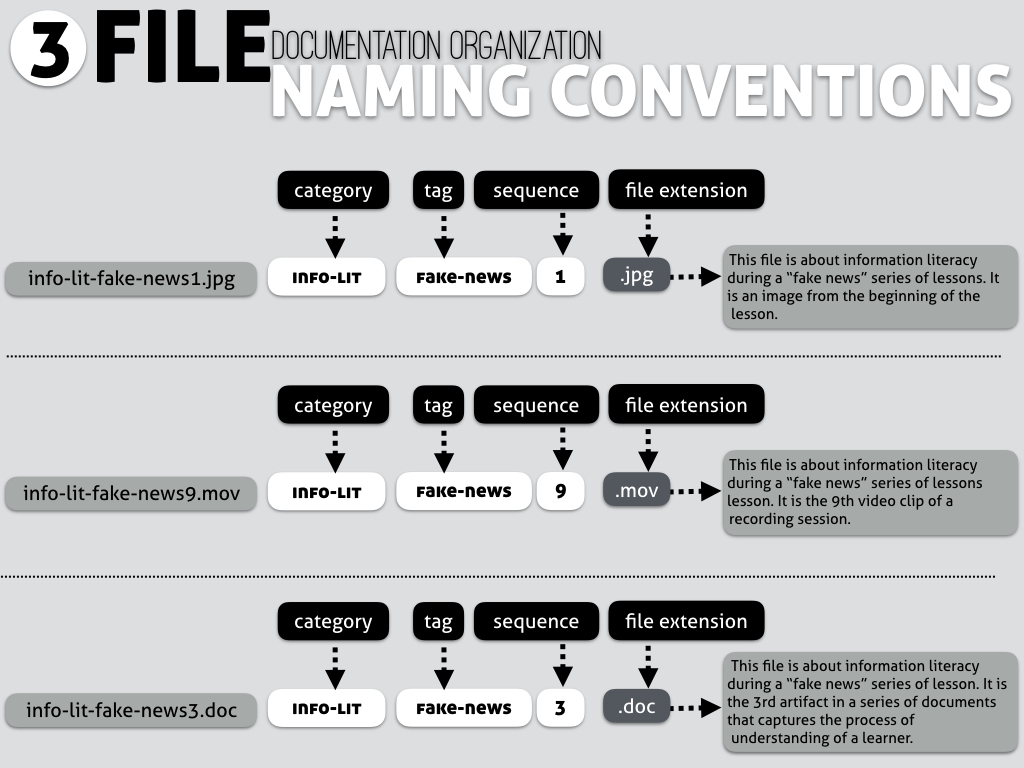
Image BC.1
To create a breadcrumb trail to a documentation artifact, start with the end in mind . In other words, begin by deciding how to best name the artifact’s file. Take a few moments to study the three file-naming conventions detailed in Image BC.1. The naming components to aid in archiving and retrieving are: category , tag , and sequence . The file extension is not written by the curator of the file, it is the default extension code based on the media type the curator has selected.
- Category – A keyword or term that indicates the artifact’s general group.
- Tag – A keyword or term that indicates the artifact’s specific focus within the general group.
- Sequence – An ordinal number that indicates placement in a series of artifacts related to the general group and tag.
- File Extension – Pre-determined based on media type or choices offered by individual tools
When creating the category and tag, being short and concise is the goal. Be certain to use lowercase letters, and hyphens or underscores instead of spaces in the file name. These naming conventions are necessary because some operating systems and scripts might not be able to read other type of the file names.
Once the documentation artifact file has been thoughtfully and purposefully named, it is time to figure out where the file needs to be saved in a hierarchy from the broadest folder to the narrowest folder . In other words, figuring out the sequence from the beginning of the breadcrumb trail to reach the desired file.
It’s Time to Take Action!
Bonus Chapter Action Step
To practice the skill of creating purposeful file names, what might you use textually to create a naming convention for images and videos taken at a family event? How about during a vacation that involved a series of events?
Create file names for several images and/or videos from a personal event based on the naming convention components: category , tag , sequence , as well as the pre-determined file extension based on the media type. Share the file names with a colleague or a friend. If the person you are sharing the images with is not reading A Guide to Documenting Learning or this bonus chapter, begin the conversation by showing him or her the File Naming Conventions image above and explaining the purpose for creating meaningful file names. Then see if he or she can figure out the intended message you are trying to convey for each file’s name to curate your family event or vacation media.
For example, the filename for Image BC.2 represents the naming convention Janet used for one of her images taken while on a vacation.
Image B C. 2
Folders and Files
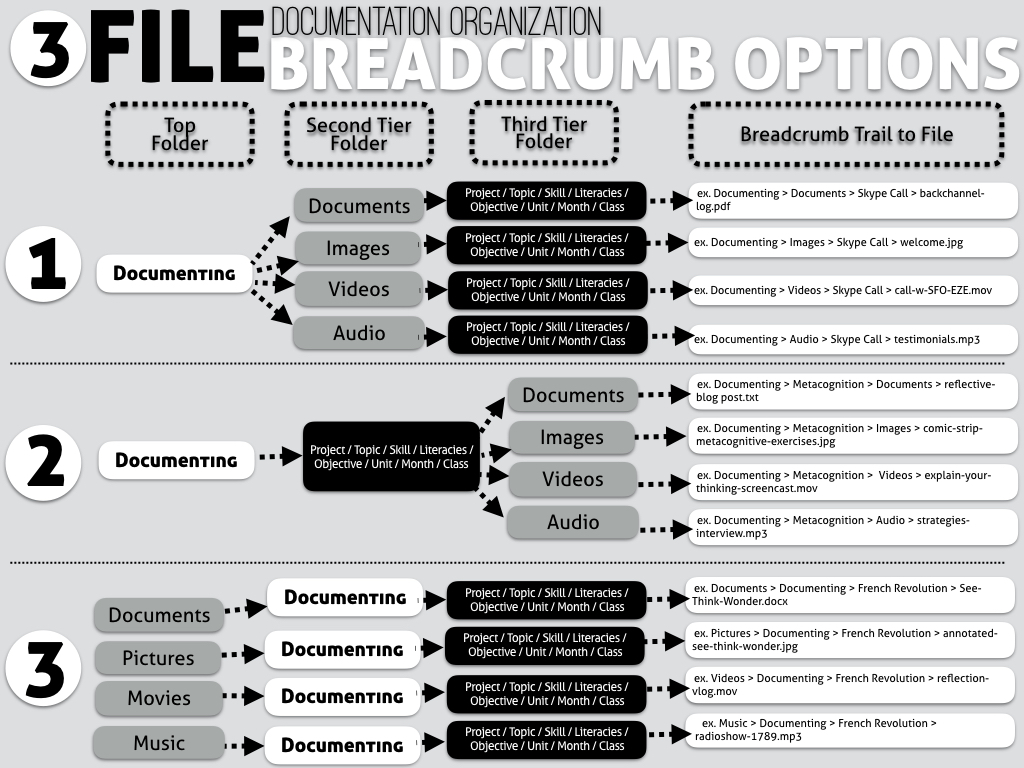
Take a few moments to read and study the three breadcrumb trail options below and expressed in Image BC.3. While there is no one right way to create a breadcrumb trail, any one of the three sequences will make archiving and retrieving documentation artifacts more efficient:
- Create a top-folder named Documenting (short for Documenting Learning) . Within the top folder create second-tier media folders, which are named based on the media types used to capture the evidence of learning (e.g., Documents, Images, Videos, Audio). Within each of the media subfolders, create the desired third-tier purpose folders (e.g., projects, topics, skills, literacies, objectives, units, calendar month, class), which is where the saved file will be placed appropriately.
- Similar to Option 1, begin by creating a top-folder named Documenting. The difference is that the media folders and purpose folders are switched in the breadcrumb trail’s sequence. The second-tier consists of the purpose folders, and the third-tier consists of the various media folders.
- This option begins by either using the pre-designated and named top-folders found in many operating systems (e.g., iOS) or by creating top-folder media folders (e.g., Documents, Images [Picture], Videos [Movies], Audio [Music]). Within each of the media folders, create a second-tier Documenting folder. Within each of the Documenting folders, create desired third-tier purpose folders, which is where the saved file will be placed appropriately.
Using a pre-determined naming convention for a file, as well as the breadcrumb trail’s folder hierarchy will save you valuable time when looking for and retrieving a desired documentation artifact.
Searching
Most devices save text, video, audio, or image media in alphabetical, numerical, or chronological order (e.g., the date the photograph was taken). Unfortunately, most of these file names are not intuitive or self-explanatory regarding quick identification of the content within those saved files. It is therefore advantageous to re-name default-named files. When doing so, revise non-descriptive filenames to include a tag or specific word(s). This makes a search for a keyword in a particular file easier to conduct. And, as mentioned previously, stay consistent with category and tag keywords regardless of media to aid in locating the files.
For example, by revising the default name to include the phrase word-prob at the beginning of all the media files containing the documentation evidence of young students’ learning-thinking related to solving one-step word problems, all the files will appear in a “word-prob” search-result list.
Categorizing and Tagging
Categorizing and tagging posts within a primary or secondary platform provides documenters and readers an avenue for locating desired information quickly and efficiently. Categories are used to connect bigger ideas under one umbrella. For example, information literacy could be a category used to connect all the blog posts a documenter has containing information-literacy topics or information. Tags are more specific. If a post is focused on information literacy that is specifically about fake news, that would be the tag included along with the associated category keyword.
Don’t underestimate the power of categorizing and tagging documentation artifact files. This is especially true when sharing and amplifying via a digital hub, such as a blog or wiki. A hub in this context is the location where a primary or secondary learner organizes, archives, and accesses all his or her learning-thinking documentation, including embedding secondary platform text, videos or images. When using a hub, it saves time by having all the secondary platforms’ files easily accessible through the hub. For example, if a blog post focused on students conducting inquiry investigations and research to try to figure out an anchor phenomenon, their teacher’s reflective documenting learning post may have an embedded Vimeo video and Flickr photographs. He categorizes and tags the blog post with the keywords: phenomenon, NGSS, SEPs, inquiry. By doing so, in future weeks, months, or years, he or a return blog visitor can locate the desired video or image by searching based on the category and tag terms, which will aid in more accurate search results.
Timestamps and Timelines
Another helpful tool when archiving documentation artifacts, as well as retrieval selection, is using a timestamp in the file name. This does not literally mean the date and time, but rather adding a number at the end of a file name in sequential order that represents when the artifact was captured. A timeline begins to emerge and makes retrieving the desired files easier as time passes. For example, if a teacher is documenting her students’ oral abilities to provide their reasoning for how they are solving word problems using precise mathematical language, as she captures video clips of them explaining their reasoning and photos of their math-problem work, she saves the files with creating a timestamped timeline in mind:
If a primary learner or secondary learner is especially interested in evidence of growth over time, another archiving strategy worth considering is to place the documentation files in monthly, quarterly, or semester folders.
| word-prob-add1.mov
word-prob-add2.mov word-prob-add3.mov… |
word-prob-add1.jpg
word-prob-add2.jpg word-prob-add3.jpg… |
Timestamping does not appear useful until there is a desire or need to see the learning over time. If timestamping has not been done initially, it is time-consuming to have to go back and revise all the documentation artifacts in numerical order. Therefore, getting in the habit of adding a number 1, even if the documentation artifact is not planned to be included as part of a series will save time in the long run, in case that desire or need changes.
Summing Up
The bonus chapter’s opening quote is by A. A. Milne, an English writer who is best known for his children’s stories about the adventures of Winnie-the-Pooh. Over time, his beloved character has become known for sharing words of wisdom called Poohisms . One that is applicable to contemplating what is involved in l ogistically planning for archiving and retrieving digital folders and files is:
“It’s best to know what you’re looking for before you look for it.”
Pooh’s adage holds true when considering how to create a documentation archive and retrieval system that functions effectively and efficiently. Organization needs to be focused on how to best customize your documentation archive. It is important to remember that what works wonderfully for one person may not for another. Remember the goal is to have an archiving and retrieval method that is consistent, predictable, followable, and scalable.
Going Beyond
To amplify your reading beyond the pages of A Guide to Documenting Learning, we invite you to contribute and share your documenting artifacts in social media spaces to connect with and learn from other readers around the world using the #documenting4learning hashtag on Twitter, Facebook or Instagram; or by mentioning @documenting4learning on Facebook and Instagram, and @doc4learning on Twitter.
To extend your thinking, reactions, and responses, you can also connect with other readers by leaving comments on chapter’s discussion posts on our documenting4learning blog.
Download the Bonus Chapter as a PDF file!


